Monday, December 31, 2012

Integrating Solr with Liferay 6

Building Solr & Installing Solr instance on tomcat.
  1. Download Solr-1.3.0 release from Solr.
  2. Unzip .tar on some location. For eg. /opt/solr/
  3. Make /opt/solr/example/solr as a $SOLR_HOME.
  4. Copy apache-solr-1.3.0.war file from /opt/solr/dist and paste it into /opt/solr/example/solr.
  5. Open up the /opt/solr/example/solr/conf/solrconfig.xml
    Replace
    <dataDir>${solr.data.dir: ./solr/data}</dataDir>
    by following 
    <dataDir>${solr.data.dir:/opt/solr/example/solr/data}</dataDir>
    Note: The dataDir can also be temporarily overridden with the JAVA_OPTS environment variable  prior to starting Tomcat
             export JAVA_OPTS="$JAVA_OPTS -Dsolr.data.dir=/opt/solr/example/solr/data"
  1. It is recommended to run the Solr instance on separate tomcat instance other than liferay tomcat.
  2. So for separate tomcat for solr, consider it here. $SOLR_TOMCAT
  3. Into $SOLR_TOMCAT/conf/Catalina/localhost , create one solr.xml file and copy following content into the file and save it.

  1. Now start tomcat and check that it is running without any error or not.
Integrating Solr plugin with Liferay

  1. Download Solr plugin which is compatible with the Liferay version.
  2. Drop the plugin into $LIFERAY_HOME/deploy directory.
  3. Start liferay tomcat server. After started liferay tomcat, just stop both the tomcat servers (SOLR_TOMCAT and LIFERAY_TOMCAT).
  4. Openup the $LIFERAY_HOME/tomcat-6.0.18/webapps/solr-web/WEB-INF/classes/META-INF/solr-spring.xml
           for bean id=”solrServer” give the solar tomcat settings and save it.
           for eg. http://localhost:8181/solr
  1. Copy the $LIFERAY_HOME/tomcat-6.0.18/webapps/solr-web/WEB-INF/conf/schema.xml file and paste it into /opt/solr/example/solr/conf/ directory.


Congratulation, you have done!

Sunday, May 27, 2012

Dynamic Query in Liferay

Liferay provides several ways by which we can retrieve data from database. One of them is dynamic query. You can easily fire complex query using dynamic query and it will reduce overhead of creating custom finder methods. Lets go step by step with easy example. If you want to fire simple AND query then here is the example.

Above query will search in table MycustomTable for records which has status as Pending and userId as 10122. If you want to sort your records in particular order that also you can do.


Above query will order records based on Modified Date and RequestId. Now if you want to fire some complex query like combination of or , And , Between and Like then here is the example. By using RestrictionFactoryUtil we can file OR,AND,Like and Between query.


As you can see above query will try to fetch those records which has subject like "Test Subject" and its created_date is in between the above dates or the records which has status as pending. To execute dynamic query.


Saturday, May 26, 2012

Deploying Ext in Liferay 6

On Deploying EXT, We face the problem that our changes are not getting reflected.

I seen people in liferay forums continuously asking for the same.

It is not perfect but will work in the case , if you can't execute the command ant direct-deploy and want to execute ant deploy command.

The following steps you have to follow in order to redeploy the EXT Portlet

My Portlet name is Alert-ext so I am referring with this name in the below steps :-

1) Stop the Server
2) put ext-redeploy-6.0.5.jar in tomcat-6.0.29/Webapps/ROOT/WEB-INF/lib/
3) Delete the Alert-ext portlet from the webapps folder if in case you are redeploying
4) Remove ext-Alert-ext-service.jar from the tomcat-6.0.29\lib\ext
5) Remove all the *-ext.xml from the path tomcat-6.0.29\webapps\ROOT\WEB-INF except struts-config-ext.xml
6) Remove all the jar file related to ext from the tomcat-6.0.29\webapps\ROOT\WEB-INF\lib except ext-redeploy-6.0.5.jar
7) Start the Server
8) Deploy the EXT Portlet
9) After that it will ask for rebooting the server once the EXT portlet is successfully deployed.
10) Now once again start the server.

Your EXT portlet will re-deployed successfully and all the changes will get Executed.

Hope it helps !!!

Connecting to different database using Liferay Service Builder

Generally we guys used to connect with the liferay default Database.
We also have requirement that Client wants there Data on Separate Schema or Separate DB.
But In Liferay how we can connect with different DB?

Don't Worry guys your problem is now solved.

Just Follow some steps as below :-

1) As you are mentioning the jdbc properties for the liferayportal in portal-ext.properties, same way mention for the external DB or seperate schema as below :-


Explanation :-
The first four line starts with the jdbc.default, it means that it was associated with the Default Data Source. So it will connect to the Default Liferay DB.

Last four line line starts with the jdbc.test, which does not belong to the Default DB. It will be connected to some other DB whose entry will be in ext-spring.xml.

2) As we are using service-builder, it means that you need new tables other than liferay default DB. So it requires for you to create new plugins project and in that you need to create service.xml under webapps/WEB-INF and with the help of ANT(ant build-service) or MAVEN (mvn liferay:build-service) you will able to create full structure for your service. But still it is pointing to the default DB.

Now you need to create a new file ext-spring.xml under WEB-INF/src/META-INF dir. Inside META-INF folder you will find couple of xml files whose entry will be there in liferay portal.properties file as below :-


If you notice the order of xml file loading in portal.properties file, then you will find that the last file is ext-spring.xml is loaded. So we will now create ext-spring.xml and putting all transaction,datasource and sessionfactory related changed on that file as below :-


3) Now the last and the final step you need to do is that you need to modify the existing service.xml as follows :-


The data-source value specifies the data source target that is set to the persistence class. The default value is the Liferay data source. This is used in conjunction with session-factory.

The session-factory value specifies the session factory that is set to the persistence class. The default value is the Liferay session factory. This is used in conjunction with data-source.

The tx-manager value specifies the transaction manager that Spring uses. The default value is the Spring Hibernate transaction manager that wraps the Liferay data source and session factory.

If the local-service value is true, then the service will generate the local interfaces for the service. The default value is false.

If the remote-service value is true, then the service will generate remote interfaces for the service. The default value is true.

You can use the local-service and remote-service attribute according to your needs.

You are now connected with your external DB.

Put your Suggestions/Comments.

Thanks for Reading !!!

Redirect to View or Render Method after Submitting the form in liferay

In Liferay most of time happens with us that after submitting the form we want to redirect it to some other page.

Now it's not difficult any more.

Please check below code.It will help you to redirect to the Static page as you are aspecting in liferay.


Congratulations, You have DONE NOW !!!!!!!

Saturday, May 19, 2012

LDAP Configuration with Liferay


 OPEN LDAP SERVER CONFIGURATION FOR WINDOWS


Softwares Used:

OpenLDAP (Windows edition)
LDAP Browsers(Apache DS,Jxplorer, LDAPsoft admin tools, Softerra LDAP admin etc)


Download Softwares:

1. You can download openLDAP windows edition from the following location:
2. you can download browsers from the locations given below:
Softerra LDAP admin: http://www.ldapadministrator.com/download.htm


Installing openLDAP:

1. Follow the instructions and choose your host as “localhost” or an “IP address”
2. Choose the port and SSL-port as you may want to use or can let it by default to 389 and 636 respectively.
3. Select a database for directory you want to use: BDB or LDAP (we have used BDB i.e berkely’s DB)
4. NEXT -> choose a password for your root directory, by default it would be “secret
5. NEXT-> install-> Finish.

 Using an LDAP Browser:

As We have used “LDAPsoft LDAP admin”
1. Start the server using by clicking on the slapd.exe where OpenLDAP is installed
2. Install LDAPsoft LDAP admin
3. Open “LDAPsoft LDAP admin” and create new connection to LDAP.
4. Specify the connection name - it could be any friendly name you may want to use
5. Specify the Hostname as “localhost” or “IP Address” as set at the time of installing OpenLDAP
6. Specify the port you are using for LDAP
7. Specify the Base DN as “dc=maxcrc,dc=com” or you may choose to click on “Fetch Base DNs” button to automatically fetch the Base DNs
9. Got to NEXT and select “Simple Authentication” method. For this, you will be needed to provide Bind DN and Password which would be “cn=Manager, dc=maxcrc, dc=com” and “secret” respectively. The Bind DN can also be populated by clicking on the button, which is on the right hand side of the Bind DN text field.
12. NEXT->Finish.

Now you have a complete connection with  openLDAP and you can create your own OUs and CNs.


How To Configure OPENLDAP in Liferay 

  1. Go to the Control Panel in Liferay 6 EE .
  2. Control Panel ---> Settings
  3. From the Right Side pannel Select the Configuration---> Authenticaion

After Clicking on the Authentication it will open different Options and Select LDAP on it.

Click on the Add from LDAP Servers

ServerName : Give any name
Default Values : Select open ldap


Fill all details as shown in image.
In Credentials : secret


After clicking on the Test LDAP Connection you will popup as shown in image.

USERS

Keep all the field as it is .

Just remove the text from the Group field at last before test ldap user button..
So, keep the Group field blank.

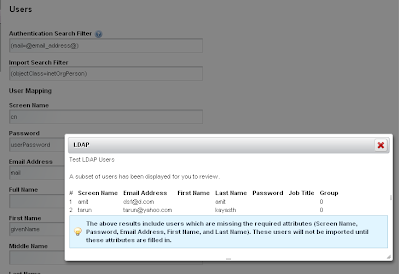
After clicking on the Test Ldap User button the popup will be displayed of the available users as shown in images below


In the Snapshot you will be able to see the users are displayed that we configured in OpenLDAP(Refer Last image in which it is shown the user that we configured in OpenLDAP Using Browser)


 Structure of LDAP with Apache DS


Congratulations, You have DONE with LDAP !!!!!!!

Liferay Eclipse Setup


Liferay Folder Structure


1. create Liferay folder in C drive
2. unzip Liferay tomcat 6.0 bundle (liferay-portal-tomcat-6.0-5.2.3.zip) to Liferay folder
3. unzip Liferay plugin SDK (liferay-plugins-sdk-5.2.3.zip) to Liferay/plugins folder
4. unzip Liferay EXT (liferay-portal-ext-5.2.3.zip) to Liferay/EXT folder
5. unzip Liferay Portal Source (liferay-portal-src-5.2.3.zip) to Liferay/portal folder

After above steps folder structure will as bellow

      c:\Liferay
            - data
            - deploy
            - EXT
            - license
            - plugins
- portal
            - tomact-6.0.18


Eclipse Setup

 
1. Start Eclipse and create three JAVA projects (plugins, EXT, Portal) as follow:

 
2. Create plugins project
  • Create New JAVA Project
  • Goto > File > New > Java Project
  • Project Name > plugins
  • Select "Create Project from existing Source"
  • Click on browse and select directory plugins (liferay-plugins-sdk-5.2.3)
  • Click Finish
3. Create EXT project
  • Create New JAVA Project
  • Goto > File > New > Java Project
  • Project Name > EXT
  • Select "Create Project from existing Source"
  • Click on browse and select directory EXT (liferay-portal-ext-5.2.3)
  • Click Finish
4. Create Portal project
  • Create New JAVA Project
  • Goto > File > New > Java Project
  • Project Name > portal
  • Select "Create Project from existing Source"
  • Click on browse and select directory Portal (liferay-portal-src-5.2.3)
  • Click Finish

5. Run Configuration Settings
 
  • Open "Run Configurations..." under the Run Menu
  • Under Java Applications node in the tree, right click and "New"
  • Click on New_Configuration and change Name: Liferay
  • On Main tab, select the portal source code project or your Plgins project
  • In the Main class put org.apache.catalina.startup.Bootstrap, don't check any check boxes
  • Go to Arguments tab, in the Program arguments type: start
  • In VM arguments put like:
-Xmx512m
-XX:PermSize=32m
-XX:MaxPermSize=160m
-Dfile.encoding=UTF8
-Duser.timezone=GMT
-Dcatalina.base=-Xmx512m
-Djava.security.auth.login.config=C:/Liferay/tomcat-6.0.18/conf/jaas.config
-Dcatalina.base=C:/Liferay/tomcat-6.0.18
-Dcatalina.home=C:/Liferay/tomcat-6.0.18  
-Djava.io.tmpdir=C:/Liferay/tomcat-6.0.18/temp

  • In Classpath tab, remove ALL User entries, do NOT remove the JRE System library
  • Select User Entries and "Add External Jars", find the bootstrap.jar file from the ${tomcat-root-folder}/bin folder and add only that one
  • In the Source tab, select any related Java project (EXT, Plugins, Portal), but also the main project. For example, if you want to also debug a plugin, add it's source path here
  • Under Common tab check Run (if we want debugging then check Debug)
  • Apply all changes
  • Run Liferay from Run Icon (View output on console)


nRelate Posts Only